How to start
Dear ImGui on Linux/Windows
Welcome to this quick guide for those interested in getting started with Dear ImGui using Linux and Windows.
Dear ImGui is a library written in C++ (integrated with C, C#, Java, JavaScript, Rust, Go, etc), that enables programmers to build user interfaces in a quick and simple manner, allowing fast iteration times during development. In the words of its own developers:
“It favors simplicity and productivity toward this goal and lacks certain features commonly found in more high-level libraries (…) is particularly suited to integration in game engines (for tooling), real-time 3D applications, fullscreen applications, embedded applications, or any applications on console platforms where operating system features are non-standard.”

Quick guide to create a project with Dear ImGui
Pre-requisites
- Git knowledge.
- Programming knowledge (intermediate level).
- C/C++ knowledge.
Quick overview
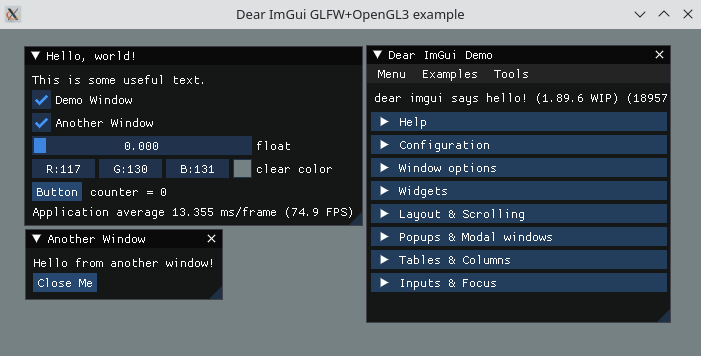
Before starting, it may be illustrative to take a look at the main code of the example, as well as the final result it produces:
// 1. Show the big demo window (Most of the sample code is in ImGui::ShowDemoWindow()! You can browse its code to learn more about Dear ImGui!).
if (show_demo_window)
    ImGui::ShowDemoWindow(&show_demo_window);

// 2. Show a simple window that we create ourselves. We use a Begin/End pair to create a named window.
{
    static float f = 0.0f;
    static int counter = 0;

    ImGui::Begin("Hello, world!");                          // Create a window called "Hello, world!" and append into it.

    ImGui::Text("This is some useful text.");               // Display some text (you can use a format strings too)
    ImGui::Checkbox("Demo Window", &show_demo_window);      // Edit bools storing our window open/close state
    ImGui::Checkbox("Another Window", &show_another_window);

    ImGui::SliderFloat("float", &f, 0.0f, 1.0f);            // Edit 1 float using a slider from 0.0f to 1.0f
    ImGui::ColorEdit3("clear color", (float*)&clear_color); // Edit 3 floats representing a color

    if (ImGui::Button("Button"))                            // Buttons return true when clicked (most widgets return true when edited/activated)
        counter++;
    ImGui::SameLine();
    ImGui::Text("counter = %d", counter);

    ImGui::Text("Application average %.3f ms/frame (%.1f FPS)", 1000.0f / io.Framerate, io.Framerate);
    ImGui::End();
}

// 3. Show another simple window.
if (show_another_window)
{
    ImGui::Begin("Another Window", &show_another_window);   // Pass a pointer to our bool variable (the window will have a closing button that will clear the bool when clicked)
    ImGui::Text("Hello from another window!");
    if (ImGui::Button("Close Me"))
        show_another_window = false;
    ImGui::End();
}
As you can see, it is a simple and compact code, especially compare it against other APIs or libraries to create user interfaces. For more information, at the end of the tutorial we leave the link to the official Dear ImGui repository, which contains more documentation about the library.
Quick start
We will use the official Dear ImGui example glfw-opengl3 as base.
Create a new Git repository.
Inside the repo use the following command to add ImGui as a submodule:
git submodule add https://github.com/ocornut/imgui.gitCreate a file named main.cpp (link has file contents). This file contains the code that we’ve reviewed previously and additional instructions to create a window with GLFW.
Linux
Create a file named Makefile (link has file contents).
Install GLFW Development library, depending on your distribution this may vary, for example:
Fedora:
sudo dnf install glfw-develUbuntu:
apt-get install libglfw-dev
Execute make while in the project root. Inside bin/ we will find the compiled executable.
Windows
Create a file named imgui-test.vcxproj (link has file contents).
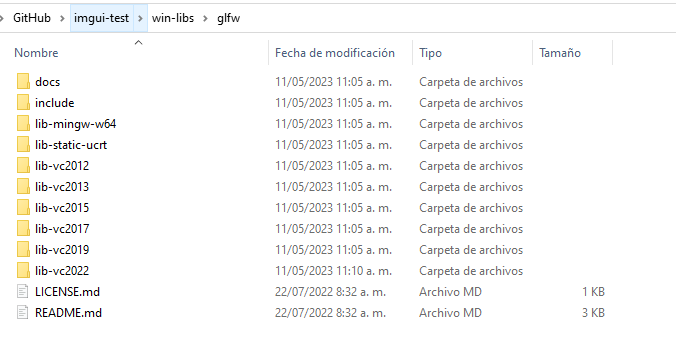
Download GLFW 64-bit pre-compiled binaries for Windows. Open zip file inside the folder glfw-3.3.8.bin.WIN64 and extract contents in the project folder win-libs/glfw (create any missing folders). In the end, it should look like this:
Project is configured to run with Visual Studio 2022, in case that you want to use another version, edit imgui-test.vcxproj (searching for vc2022 and replacing it with any of the available versions, as seen in the previous image).
- Open the project with Visual Studio and run it.
More information
Official Dear ImGui repository
Leave a message.
Thanks for following us. Share this article with your friends.